Sunday 9 October 2011

Design Memo -- Harlequin (or nine-patch diamonds)

I have received requests now and then for the design interpretation for certain designs, mostly advanced ones, and while I do not wish to encourage you to try the new designs while you are still not ready for it by posting advanced design here, it's not very practical for me to answer to the requesters by sending an e-mail one by one and some cases the requester did not provide me with the way to contact them by leaving a comment anonymously without the link to their e-mail addresses or blog posts/web pages.  So I have decided to give you a design memo of the most requested one today.  Although I freely share the design memo with you, it is still my intellectual property and I would like you to respect it.  It is not my intention to imply that any one of you would abuse it, but I just wanted to make a statement so that no misunderstanding would arise at later date, is all.  You would be horrified to know how serious the copyright infringements are on the web.  Having said that, here we go: 
Skill Level:  Advanced
Required technique(s):  Forward stitch, back stitch, and weaving
Number of stitching path(s):  Two and then later becomes four
Design period:  Two sections
Design repeat:  Two sections
Number of round(s):  Single
Number of colour(s) used:  Four

This design is a kind of my original.  The reason why I affixed "a kind of" before "my original" is I cannot be certain that anyone had ever made it before I did but I stitched the design without referring anything, so this is "a kind of" my original.  I call it "Harlequin" because it reminds me of Agatha Christie's "Mysterious Mr Quinn" which based on the Italian masked character, Harlequin. 

The design consists of the centre part of nine-patch diamonds and framing and you have to determine before you start stitching how many stitches you are going to make in one section.

My framing takes six stitches so subtract six from the number of the stitches in one section and the reminder is the number of stitches you are going to stitch for the centre nine-patch diamonds.  It may not be very convenient number for you to form nine-patch so you have to adjust it by:

1) Adding or taking a stitch or two from the total number of the stitches of the section.  Although this is easiest, you may have some difficulty to pack extra two stitches in a section, especially the section is already too packed to start with. 

2) Changing the number of the sections i.e. narrowing/widening the section.  Please note that the number of the sections has to be an even number as "rounding" will not work for the design.  Also please note that the number of the sections will affect the shape of the diamonds, i.e. the more sections, the skinnier the diamonds become.

3) Making the ring size smaller/bigger/shorter/taller, possibly in conjunction with changing the number of sections.  Although It involves most tedious work, you get the best result.  However, if your thimble has to be in the specific size, then it's not an option for you.

Start stitching with two paths and weave 3x3 as you go to form nine-patch's.  As this is nine-patch diamonds, the colour of the second stitching path appears at the four corners and centre small diamonds, so make sure to stitch with the right colour for each path.

Then start stitching the framing commencing from both sides of the portion you have already stitched, therefore the number of your stitching paths now becomes four, stitching alternatively and all in the same colour.  Stitch a row in the first path with back stitch starting from the left side of the first path of the diamonds, then in the same way stitch the third path, then the second path with forward stitch starting from the right side followed by fourth path.  Thread the different colour and stitch the second row in the same fashion, and for the final third row, change back to the colour you used for the first row.

As I stitch the diamonds portion all by forward stitches so the threads lay slanted in the top and bottom triangles however, if you opted for back stitches, back-to-back with forward stitches, then it appears as V-shaped. 

Wish you happy stitching!

Monday 19 September 2011

La Chanson Japonaise ... ???

A Japanese music duo was featured in one of the morning TV show a few weeks ago I was told, that they are Japanese but sing in France and that they sang in a TV trailer of Festival Paris Cinema last year.  Must be very talented, I thought.  So, I went and looked for them on YouTube and found them.

Zoun-Doko Bushi by Les Romanesques on YouTube

I do not have a word to describe their performance.  Unusual?  Different?  Humoristique? Peculiar?  Whatever I (and you) think of them, their song sure sticks to you.

Tout va bien-ien-ien, tout les citoyens-yens-yens
Je me promรจne le dimanche matin
Les pigeons picorent des miettes de pain
Je mets mes pieds sur une crotte de chien


The melody itself is of a Japanese origin, but their lyrics are their own I think.

Then there is another song:

Mademoiselles by Les Romanesques on YouTube

Comment allez-vous, 
ma jolie petite fille, mademoiselle? 


They are quite something else.


The picture is nothing to do with today's post, but it's always nice to have some pictures so I thought I should include at least one.  This is one of the "on the process" pictures I took last summer when I made several thimbles in the same design but with silk thread in various colours and gold thread.
I believe I have shown this picture before and some of you might remember.


*** Shop Update ***

The listings of four Japanese print (cotton fabric) are going to expire very soon and as I announced it before I am not going to re-list them.  If you ear-marked them, please go and have a final look.  The listing of a set of 24 silk sewing thread has already expired.  I plan to revamp my shop (not know when I actually get around to do so, though), so it will remain unavailable at Etsy however, if you would like to purchase it I can list it as "specially reserved" for you.  Please drop me a line.

Tuesday 13 September 2011

Welcome to my blog

Last week Craftgossip generously featured my last post, in which I listed links to my previously published posts about "how I make my thimbles" so that you could find them easier and friendstitch listed a link to it, too.  Thanks to these two wonderful sites (if you haven't visited either of them, I strongly suggest you do so now.  You won't regret it, I am sure) I received a great number of the visitors and I would like to welcome those of you who have chose to return to read my post, again.

Let me introduced myself quickly.  My name is Chloe Patricia and I live in Japan.  I am a thimble maker (not for a profession, of course) and I make the kind of thimbles in the photo above.  Not looking very much the thimbles you are familiar with, I know.  Japanese thimbles are traditionally ring shaped and not a cap.  There are metal and leather thimbles (also in ring shapes) but Japanese people have been making their own thimbles at home, re-purposing leftover fabric and threads. 

The thimbles I make are the most elaborate form: stitched all over with silk threads.  With less and less people who do dressmaking and kimono sewing, along with factory made metal thimbles, this kind of thimbles were almost extinct after World War II until several years ago it was re-discovered.  They are highly decorative but they are still a working tool, too.  Since the core of the ring is paper, it's pliant enough to re-shape itself to conform your finger as you are wearing it while it's sturdy enough to help you pushing the needle without pricking your finger.  
It requires a little getting use to to make your own, but as I showed you in the previous posts (you can find the links to these posts in my previous post) it's not very difficult once you got the basics.  I would like you to remember that these posts are not tutorials.  They are merely the posts which show you how I make my thimbles.  Please also remember the ways I showed you are not the only ways.  There are other ways and possibly better ways.  If you are happy with the way you do, please stick to it and tell me about it so that I will consider converting to it. 

If you are not quite sure if this kind of thimble making is really your thing, or you would like to try it first quickly before fully committing to it, I have a kit at my Etsy shop.  The kit includes a finished thimble base with starter stitches done and an instruction booklet, so that you can just thread the needle (also included) and carry on stitching.  It takes about two to three hours to finish it. 

I also host a photo sharing group at Flickr where you can share the photos of your thimbles (or anything else you made using the same technique) with the rest of the group, or any other visitors for that matter.  By the way, we have a new member recently there and PokiPaws (alias of the new member) shows us her first and second thimbles.  I am amazed that although she used DMC's 6-strand embroidery floss, the finish has luster as if it's silk or rayon.  It made me wonder if I should re-evaluate the value of the cotton floss.  My photo sharing group is not a contest; I merely wanted to give my fellow thimble switchers a place to show off their work when I started it and it remains the same, no critics either.  The primary rule, aside from the thimbles you upload the photo of have to be your own work, is for you to mention the size of the mould on which you formed your thimble base and the material you used.  The size of the mould does not have to be very  precise.  Just measure the circumference of the tube you use with a measuring tape, either in inches or millimeters will do.  

I love to hear from you and if you have a question about thimble making, please don't hesitate to ask.  You can leave the question as the comment or e-mail me.  You should be able to find my e-mail address at my profile page.  It may take for a while but I will try to answer it. 

Sunday 4 September 2011

another mumbling with the typhoon gone but a new one approaching ...

The current typhoon is over the island and now on the sea but it was disastrous leaving 21 death and 54 missing.  As I told you yesterday, it proceeded (is still proceeding) extremely slowly and it dropped a tremendous amount of rainfall over Japan, leaving floods and landslide all over the country.  Even it has been over, it still keeps raining, heavily in certain areas. 

We are doing fine, virtually no damage at all, just a heavy rain last night.  Kyoto had been a capital city of Japan for over 1000 years for a reason with less damages by earthquake, floods, and other natural disasters than other area.

However, there is a new typhoon has appeared on the weather forecasts.  It's 13th and is heading to this way ....

This is one of the two thimbles I told you I had made recently with the one I showed to you yesterday.  The technique is the same, but the colour scheme is different and as a result it appears as a different design.  I wanted this one in shades in the same way as the previous gray one.  I used three colours but obviously the lightest in shades is too light and the contrast in colours is stronger than I hoped it would be.  I am going to dig in my thread stash boxes later to see if I can find a suitable one.

I opened one of the word documents I have neglected for so long today.  It is titled "Starter Kit".  As you may have correctly assumed, it's my long standing project of silk thimble starter kit instruction.  I really hope I can offer the kit (or maybe it becomes an on-line course) later this year.  I posted about how I make my thimbles before and you are supposed to make your own thimble following my instruction.  Here are the links to these posts:

thimble base making

marking paper

how to stitch

post script of how to stitch  (please scroll down a little bit since it started with other subject)

tidying up your initial stitch

how to make two-scales design thimble  (one I used to call bi-coloured scales)

cosmetic touch-up

There are other posts tagged as "how I make my thimbles" but you do not need these recent posts, yet, in order to make your own first one.  Please be patient with my English.  I read these posts mentioned above and found a lot of grammatical and typing mistakes.  Also I used to call "sections" as "segments" in the earlier posts until I had to use the word "segment" to represent a portion of the line.  Questions are always welcome.  You can leave a question at either the particular post or at the most current one, it doesn't matter.

If you would like to see what it is like quickly, may I suggest "First Thimble Kit" at Etsy.  The kit includes a ready-made thimble base with two rows of stitches done and a instruction booklet.  So you just thread a needle (also included) and continue stitching.  Please note that the instruction booklet does not show you how to make a thimble base. how to apply padding, or how to mark your marking paper.

Lastly I am still hosting a photo sharing group at Flickr.  Please come join us once you made your own, or just pop in and admire our work there.  Thank you.


Saturday 3 September 2011

mumbling with typhoon coming and staying ...

It was not very nice to have a typhoon hanging around for a week and finally the 12th typhoon (we don't name typhoons in Japan.  We just give them the ordinal numbers instead) is now almost at the edge of the one of the four main islands and moving northward VERY slowly.  It is said that the typhoon is similar in size to Irene which hit NYC and moving in the speed equivalent to jolly bicycle ride.  The news report said that some parts of the country got half the annual rain fall over the night.  The morning news was full of flood and landslide.  Fortunately for me, the area we live has not affected very much, so far.  It's just like a very windy day now but it's going to be very rough tonight.  It seems that the typhoon got slowed down further.  

The photo is my most recent thimble.  I have made two more in the same design but in different colours.  I like its blue and gray hue.  Since I do not dye my threads, I have to shop looking for the "right" colours.  The haberdashery I frequent only sells Fujix Tire silk thread but about a year ago I purchased other manufacturer's silk thread on-line as dead stock as they were out of business.  The brand name was Hyoutan and their colours are very delicate and in lovely hue as you can see in the picture.  It's quite a shame that they are no longer in the business.

As you may know I have listed Japanese cotton prints fabric at my Etsy shop and the listings will expire on 19th September and I am not going to re-list them.  If you ear-marked them for the future purchase, please have another look at them before the listing will be gone.

Speaking of Etsy, well, I am not very happy with some of the listings there.  It's about copyright infringement.  I switched from paper books to e-books years ago except the picture heavy crafts and cooking books and a few years ago something called "geographic restriction" was introduced in e-books market and you cannot buy certain books if your credit cards are not issued in the correct country.  It's about the publishers and/or writer's copyright.  The certain publishing house only bought the right to sell in the certain countries and if you do not have a credit card issued in that group of countries you are not entitled to buy it in e-book format while you are welcome to import the paper book published by the same publishing house.  It does not matter where you are currently living, it's the credit card which matters.  Weired.  I am not very happy about the situation and I do not fully understand or agree with their reasoning but I can accept it.  The writers' and publishers' rights have be protected after all.  What I am upset about is there are many of the sellers at Etsy who simply scan the paper books and sell it in JPEG or PDF format saying it's "e-books".  It's outright piracy.  What upsets me more is the fact that there have been many people who bought them.  It's quite easy to realize that the "book" was scanned manually because the listed photos of sample pages show the edges of the pages of the book or a trace of shadow which indicate that curved pages at the binding.  It's quite clear that the pages of the books are scanned and they chose to ignore the fact that they were buying the illegally copied books, or just don't care if it was a legitimate book or not as long as it was cheaper than buying from the bookshop.  I have reported several sellers but it's a up-hill battle.  Please pop in to Etsy and search for "ebook".  You would be amazed to find so many scanned PDF/JPEG files among the seller's original patterns and instructions.  When you add "Japanese", then the majority of the results would be piracy.  What the world has become ... 

Saturday 20 August 2011

hot, hotter, and hottest and ...

Hello, I am back.  Not that I was on holiday or was ill.  Thank you for visiting my blog while my absence.

It's August.  The most detested month if you ask me.  Most Japanese people do not like summer (in my opinion), unless you are on the beach side.  It's really, really a miserable month down here.  However, this year I have my beloved ice cream maker with me.  I have of course made a regular ice cream but I find sorbet is easier to make and more to my liking.  To make fruit sorbet, you just process your fruit through the blender, sieve, and chilled it in the fridge, then process it in the machine.  My absolute favorite is watermelon.  Oh, how I love my ice cream maker.

As you may know I live in Japan and one of the traditional performing arts is called Noh.  Kabuki is the other and more famous and fancier.  Kabuki has been performed in both Europe and North America so you may have known what it is like.  Noh, on the other hand, is a masked play, mostly singing and dancing.  The singing is on a little monotonous side and sounds like chanting and dancing is very subdued, so subdued the performer almost do not move.  No set or prop on a few metres squares of a stage.  Not for everyone but it's beautiful nonetheless, especially if you could catch the meanings of chant like singing.  There will be a performance held at the Noh Theatre near our place later this month and I am looking forward to it. 

In case you are wondering if this is still a craft blog heavy on Japanese silk thimbles, here are two of my latest thimbles:
I used to make a lot of this design.  This is a weaved nine patch diamonds but I like to call it "Harlequin" because it reminds me of the cover of Agatha Christie's "Mysterious Mr Quinn".  
This one is the same design I have been making recently a lot; pinwheel.  Because of the colours I chose for this one, red, green, and gold, it resembles poinsettias.

I have added the poinsettias thimble to my "Share Your Thimbles" at Flickr and found out that we have a new member to the group.  Please kindly go over to the group's page here, and welcome our newest active member, May as magic_pochacco.  She has uploaded a lot of lovely thimbles and beadings.  May, if you are reading this post, please kindly mention the size and material of your work in the description field of the photo. 

If case you are interested in purchasing my thimbles, here is a link to Etsy.

Saturday 16 July 2011

hot, hotter, and humid ...

Half way though July and it's getting hotter.  As you may know, I am not a summer girl; as a matter of fact, summer is my least favorite season.  For those of you who live in northern (or far southern) parts, summer is a season with nice warm weather with longer days, but those of us down here, it's just very uncomfortable months.  It's almost 36 degrees C with 70% humidity outside today.  For your (who lives in North America) information, 36 degrees is about body temperature.  Of course Nadia who lives in Tunisia who left me a comment on the previous post said she was suffering from 100 degrees F, which I understand is over 37 degrees C, so I should not complain much (it's just one degree in difference, but I know one degree at this high temperature makes a very big difference) but still it's not very fun enduring steamy weather.  I am unable to enjoy the heat, I just can't.  No sun bathing for me, thank you very much.

I got myself an ice cream machine the other day.  I have always wanted one but didn't have a reasonable excuse to buy one.  Not that I got a good reason this year, but I went ahead and bought it anyway.  My machine is a small one and it can only process about half a litter of ice cream base at one go.  It consists of two parts; a container which requires to be kept in the freezer for over 10 hours in advance so that it will be nice and well chilled when processing the ice cream, and an electric paddle which placed on top of the container (as a lid) and whisk the ice cream during processing.  

My favorite flavor so far is apricot sherbet.  Just cooked apricots in the syrup with a slice of lemon and processed it in the blender and sieved and chilled, then processed it through ice cream machine.  It's very yummy as the way it comes out of the machine, all nice and soft and chilly, but once the sherbet is stored in the freezer, it becomes firm and you can make ice cream soda with it.  Well, it's not ice cream, so I should not call it ice cream soda.  Can you tell me what's supposed to be called?
Instead of club soda, you can use dry white wine or sparkling wine.
and it's a lovely treat for hot and humid summer.

Tuesday 21 June 2011

Bal Masque

Some of you who lives in Northern countries actually celebrate Midsummer while it's just another day in wet season down here in Japan.  It's kind of funny since Midwinter is marked on the calender as one of the days of importance.  To be precise, Midsummer is marked as a day of importance on the calender but we do not celebrate or anything.  Perhaps everybody so hate winter and we all need a reminder spring will come eventually, before the weather becomes harsher (the coldest is February here).  

Anyway June in Japan is not a very nice month.  It's VERY WET.  It's either wet and chilly or wet and hot.  It's a transitional month before summer which is worse; July being hotter and humid and August being the hottest and more humid.  

It's not very comfortable to wear a mask in June in Japan (or any other summer month, for that matter) but if I were to attend a masquerade ball on Midsummer's night, then I would like one of these masques here and dress like Titania.  "The Merchant of Venice" is a mask maker whose web page I stumbled across years ago.  They do not update their web page very often, if ever, so after a few visits I stopped checking on it until about a month ago when I moved from Internet Explore to Firefox and thought it was a good idea to make sure all the bookmarks still worked.  The page still exists and I am glad for it but I doubt they have added any new mask since last time I visited their site.  I have not purchased any yet, but my favorite is a one called "succubus" which you can find in Gothic category.  I might one day place an order for it...

Happy Midsummer and enjoy the longest day of the year.

P.S.  I wonder it's also called a midsummer even in Southern hemisphere?

Thursday 16 June 2011

prototype I and II

It's already halfway past the month and I finally managed to upload my contribution to Flickr photo sharing. 

When I announced this month's photo sharing earlier, I gave you a small peek of my current project.  It was a needlework tray and pin cushion set as many of you figured it out.  I have stitched two third of the tray and pin cushion and before continue stitching the rest, I thought it would be very prudent to make a prototype to determine the colours I chose would really work fine. 

Not too bad, but not exactly what I thought it would appear.  The darker blue and green are too conspicuous and needed to reduced it to a single round.  Toup and silver look too much alike and no, it won't do.  Perhaps much darker colour might have worked better?
Sorry about the blurry picture, but one less dark blue and green with dark charcoal and dark olive, the pin cushion appears completely differently.  The pin wheel parts and squares appear more prominent and this is not the effect I prefer for this particular project.
So, it's white that I finally chose for the tray with silver metal thread.  My metal threads are smaller in size than the silk I use and since I reversed the proportion of silk and silver for the last part of the stitching, I encountered the small problem of coverage at the edges and it shows as you can see.  I really should have made the third prototype.  The stitching part of the tray is finished and it only require attaching the lining to the inner bottom.  I am not really sure if velvet works better than satin but as I have some velvet in my stash and no satin at all, it's most likely I would use velvet.  I will show you when I finished lining the bottom, in either material, along with the new pin cushion in matching design.  In the meantime, wish you happy stitching.

Thursday 2 June 2011

Share Your Thimbles June 2011

It's June and it's time for "Share Your Thimble" on Flickr.  Last month we only had four people who showed us their thimbles.  All are regular participants and their works are lovelier than ever.  If you have not visited the Flickr to admire these little beauties yet, please do so from here.  Although all the May's thimbles were advanced design, the simple yet elegant and sophisticated two-scales are always welcome.  "Share Your Thimble on Flickr" is a photo sharing group where anyone can upload the photos of their Japanese silk thimbles and not a contest.  No one win.  No one criticize anyone's work.  Just the place to show off your thimbles.  You can join the group with your very first thimbles. 

Here are the rules:

1. The thimbles (or any other rings) have to be your own work.

2. Although the name of the group reads as "thimbles", your work is not necessarily a thimble and you can make your rings in any size you would like, as small as a focal beading for a necklace or as big as a bracelet, or even bigger.

3. As stated above, they have to be your own works however, you can use the ring base from the kit if you choose to do so. It may not seem to be fair, considering I sell the kits, however, they are many other kits available (at least in Japan) and some of you may be able to obtain them, and it is definitely not fair to exclude the people who is brave enough to share their first work with us from the group.

4. No technique restriction applies. You can use back stitch and weaving in addition to the forward stitch, and even embroidery on the surface if you choose to do so. This is not a contest. You do not need to use these techniques if you are not up to them or you simply do not feel like it. A simple yet elegant two-scales design is always welcomed (and it's one of my favorite designs).

5. You can use any material, and in any colours, you would like.

6. Please state the size of the mould on which you formed your ring base in the description field of the photo, either in millimeters or in inches. Please also mention what threads and padding you used, too, so that we could compare notes. In case you bought one of my kits, here are the sizes and materials: "first thimble" is 50mm in circumference and Tire Silk size 9 & floss silk padding. "small pincushion" is 61mm in circumference and Tire Silk size9 & floss silk padding. "medium pincushion" is 103mm and Tire Silk size 16 & knitting yarn for padding.

7. You can upload as many photos as you like. You can upload several photos of one thimble if you choose to do so.

Now, please start uploading your photo from here.

I have not finished my contribution to this month's photo sharing yet however, it's preferable when the post is with photos, any photo.  So here is a small peek...
Can you guess what they would be when finished?

Friday 27 May 2011

a little bit of cheating - this is how I make my thimbles

As announced in my last "how I do" post, I am going to tell you a way to cheat a little so that you can simplify your marking paper. 

The crossing of the threads always happens at the mid-point of two sections.  This is the fact.  When I posted this article, I showed you how to apply this fact to simplify your marking paper, as in 28 sections into simple 7 sections.  Today I am going to show you how to simply your markings of period of eight scales design.  This involves "weaving" so you may not find it simplifying but I will show you how nonetheless.

The weaving is exactly what the name suggests; you weave your thread when stitching.  When you stitch the first path, there is nothing on the thimble body so no crossing of threads at all.  When the second path is stitched, your current thread travels over the thread of the first path and it makes the crossing of the threads and the crossings form the horizontal line on your thimble as you go, to give it a two-scales design.  The weaving is to have the thread travel beneath the existing threads on the thimble body.  How many threads under which your stitching thread travels and where to weave determine the design.
 
This is a design diagram of period of four scales (four-scales) design.  In order to make it easier and simple, I am going to explain how weaving technique helps you with this design. 

According to the design diagram, you are supposed to start stitching from first path in red, then the second in blue, the third in green, and the last in yellow with the marking paper of sixteen sections.

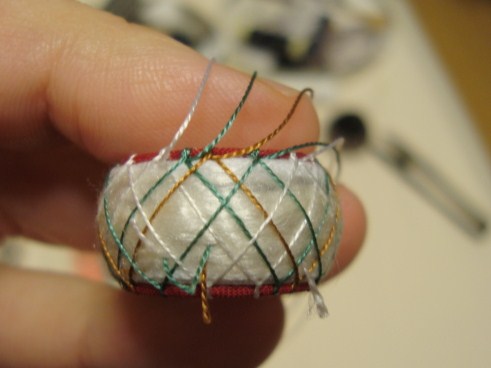
Now, I will show you how to stitch a period of four scales design without having four-section-marked paper. There supposed to be sixteen sections in total for four sets of four sections (period of four).  Instead of having sixteen-section marked paper, I made my marking paper with only eight sections.  Then, stitched the first path, then the third path skipping the second path.
Here is a picture where I finished stitching first (white) and third (green) paths as if I was going to make a two-scales thimble.
Here I was trying to start the second path.  As I told you, the crossing of the threads always appear at the mid-point of the sections, so the start of the second path should be where the tip of the needle appears on the top side in this photo.
Made an initial stitch and was trying to make a downstroke stitch.  Please focus on the light brown thread and green thread.  In the picture, the light brown is placed on the green one and this will not do.  As the light brown is the second path and green the third, light brown should have traveled beneath the green thread.  Now is the time to use weaving technique; making your stitching thread travel beneath the existing threads on the thimble body.
You slide the needle, the other end, where the eys is, firstly beneath the green thread.  Please make sure not to disturb the padding.  By disturbing, I mean try not to pick any padding material.
Pulled the needle through.  I am sorry the picture is not very clear.  I hope you could see the green thread is on top of the light brown one.
This picture shows it better, that light brown travels beneath green, on the other hand please note that the light brown is on the white thread of the first path. 
Here I made all the stitches of the second path in light brown, traveling beneath the green, i.e. woven, which is the third path and on white which is the first path.
Now, it's time to start the fourth path.  Make an initial stitch at the mid-point of the section.  Make sure that the stitch at the bottom in light brown, the crossing of green and white, and your initial stitch stay vertically at the same position.
I used white for the fourth path so it's not very clear to see, but since it's the fourth path, you do not need to weave your stitching thread at all.  The thread of the fourth path travels on top of all the threads.
Here, all done nicely with only an eight-section marking paper. 

In the same way you can make a period of eight scales (32 sections over all) design with an eight-section marking paper.
Started a new path between path 1 and path 2 of the previous four-scales.  I was trying to make eight-scales so the path 2 was to be path 3 and the new path I was creating in the picture was to be path 2.
My current stitching thread was of path 2 of eight paths so it should have had to travel beneath all the other three threads except the first path because the other three were to be 3rd, 5th 7th path respectively.
The needle is passing beneath the green thread of path 5 and ...
path 7 in white.  The last thread on the thimble body in white was of the path 1, so the stitching thread had to travel over it.
Here the down stroke stitch was made.  Please note that the green thread of path 2 travels beneath firstly light brown (path 3), another green (path 5), and white (path 7), but not the last white which is path 1.
Have done whole row of path 2.
Was starting the path 4 ...
In the same way as before, wove only the 5th and 7th paths, as the current thread was of path 4.
The white between light brown and green was my stitching thread of path 4.  It travels beneath the green and first white but travels on the second white, second green, and light brown and the stitch at the bottom was made. 
Path 4 was done.
You now know the drill.  This was start of path 6.
You know what this was now.  The 6th path in green (second green in the picture) only went beneath the white, and on everything else.
Path 6 was done.
The last path at last.  This is my favorite.  Can guess why?
As this was the last path (path 8), no need to weave at all!
Here all done with only eight-section markings but now the thimble had 16 sections.  
Perhaps you may find this rather daunting and not worth trying.  I felt myself while writing this post that it sounded rather tiresome to determine which thread go on or beneath which.  However, once you start stitching, it is not that difficult.  Just need to make sure which path you are stitching, is all and you will know what to do.  After all, you only have to do this for the first row.  From the second row onward, you can stitch from path 1 to path 8, in numerical order.

I would appreciate the feedback from you once you tried this technique. 

Saturday 21 May 2011

pin cushion in pink

The design on my latest pin cushion was an experiment and it appeared as I thought it would be, so in that sense it was a success.  However, I find it a little bit too busy.  Maybe in different colours...   Actually it is a prototype of my latest project (aside from new thimble kit).  I thought it would be lovely to have a work tray for needlework with its side finished in the same way as thimbles.  Actually I got around and made one for myself.  That first one taught me I needed to improve how I attache a bottom to the ring.  So I made another tray base, I would say an improved one, last weekend and I have started experimenting in the smaller scales, hence a pin cushion.  The height of the side is 15mm plus bottom, the same as the tray so my experiment can be adapted to the tray easily.  I like the design but it would look nicer when the design is two or three tired with higher sided ring.  I may not pick this one for the tray but I believe I am going to start a new experiment on the design, too, for something else.

Beverly at How Sweet The Sound is hosting Pink Saturday this weekend, too.  She set up a list of links of the participants so that we can visit and see what other people has found for their posts in pink.  I wish you all happy pink Saturday.

Thursday 19 May 2011

Share Your Thimbles May 2011 part II

I have realized that I have not added my thimble for this month's photo sharing yet.  It's now on Flickr as well as Pat's lovely thimble.  There are more than 10 days for you to make your own.  Look forward to seeing your work there, too.

thank you for your support and prayers for Japan

I have planed to post this one for so long but have not got around to do so and I feel really bad about it.  It has been over two months since the earthquake and tsunami hit Japan.  Since then we, who live in Japan, have received a huge support from all over the world and I would like to thank you all for your effort to help us.  We cannot thank you enough but I would like for you to know we in Japan all appreciate all the efforts and all the prayers you made for us.     

Perhaps some of you are wondering what happened the "sending tote bags for school children in the affected area" programme.  It went very good indeed.  They wanted 1000 bags as a first batch to send to the affected area by 15th April but in the end they could manage to receive 59,000 bags!  The first batch of 1000 bags went north from Tokyo on UNICEF's truck on 7th April, and thousands of bags traveled northward to the children in the affected area everyday afterward.  You can read the report here, although it's all in Japanese.  Thank you letters are also posted as well as the list of the name of the participants of the programme. 

I read about a lot of craft people sent their work to Japan for morale support, like comfort quilts and temari.  Big thank you to you.

Wednesday 18 May 2011

Etsy meet in Japan + social networking + shop update

As most of you probably know I sell thimbles and pin cushions I made at my Etsy shop as well as "first thimble kit" and silk thread, plus occasional floss silk wadding.  Etsy is an on-line market place concentrated on hand made products and supplies.  I started selling at Etsy shortly after I had started this blog and of course have not made much sales.  I do not make much sales when compared to other more active sellers but I cannot complain as my merchandise is not very popular items.  My sales have been heavily depended on the "word of the mouth" as you call it.  Someone mentioned Japanese silk thimble in their blog post and put a link to my blog for tutorials and I got quite a few visitors and consequently a part of the visitors also visited my Etsy shop and some of them actually made purchase.  I believe this is the way most of my sales were made.

I may have alarmed some of you by my previous post about statistics but I can assure you that I do not have any interest in what you view on-line.  I received about 20 or so unique visitors daily with total 40 to 50 page views according to stats application I installed here and when the number of visitors hit over 100, then it is certain that someone mentioned my blog or Japanese silk thimble with the link to my blog somewhere.  I try to track the source and leave a thank you comment there and that's that and nothing more.  Checking key words sometimes tells me what the visitors wanted to know.  A little while ago the keywords analysis shows "backward" along with my name.  It made me wonder if some of you might have been wondering how to make backstitches.

Then late last month I received a message from Etsy International Team (which I did not even know existed) that a representative would come visit Japan and would like to have a meet with the sellers in Japan.  And so I went the other night to meet other fellow sellers and Etsy people.  We had about twelve participants and it was more than I expected as the venue being not very convenient for most.  I am not sure what I was expected from the meet but I found it quite interesting.  That to know that Etsy would like to expand Japanese market.  Not Japanese customers buy from the sellers overseas, but domestic sales.  At the moment most of the sellers (at least the ones, including myself, who were there at the meet) only sells to overseas.  Not that we do not wish to sell to people in Japan, but simply we do not have Japanese customers.  The language is a huge barrier as well as payment options but the biggest impediment is most people never even heard of a hand made craft marketplace called Etsy, ever.  Etsy has been trying to be multilingual and a few of the European languages have already introduced we were told, but that multilingual features only applies to the public space like top page and help pages and not individual listings.  I myself would not call it being multilingual.  As a customer I find it quite annoying when the language option only available on top page.  Not having a very high expectation about Japanese domestic market but anything to increase sales is welcome was consensus at the meet among the sellers it looked. 

What I really found interesting was that the majority of the people at the meet did say they facilitated Twitter.  Earlier last month, another craft market place called ArtFire with which I have created an account with but never listed anything, sent me a newsletter that they were having a boot camp for social networking and asking me if I would like to join.  As a matter of fact I had opened the account at Twitter about several month ago but immediately after I got myself an account I had realized that I had not had anything worthy to Tweet.  Did you really want to know what I was going to prepare for dinner?  Perhaps you might have been interested in what TV programme I watched the other night.  What do people actually tweet about?  So after creating an account I had put Twitter aside without tweeting anything at all.  So the newsletter last month from ArtFire about incorporating the social network tool with sales intrigued me, intrigued me enough to sign up.  It turned out the boot camp is a kind of on-line discussion.  How to sign up the social network such as Facebook, Twitter, and blog and how to maintain them.  It is actually quite informative for the very beginner such as myself but may not be so for those of people who already had a fundamental knowledge about how they work.

I am still not sure how it works, but I made my first Tweet on my latest listing at Etsy.  It appeared on my account page and there is a link to my shop as well as two photos I uploaded there.  It is actually quite nice and it could be nicer if someone besides myself could have seen it, too.


These four fabrics and a new thimble are now on the shelf at my shop at Etsy.  Please come and have a look at here.

Sunday 15 May 2011

statistics

Although it does not show on this page, I have installed one of these statistics application here.  It shows how many visitors and page view I got.  The reason I installed is not so that I could check the number of the visitors daily.  I know my blog does not get much visitors.  I am an infrequent blogger with a small number of readers and I am quite content with it.  What I want to know is where people come to visit to my blog, so that I could know my reader a little bit more and I do not mean geographically where you are, although the "visitor map" is very fun to look at.  Most of my readers are in Europe and North America with a small number of views from Asia and Australia however, I have recently started to receive viewers from South America, Africa, and Tropical Islands.  Wow indeed although they could be a one-time viewer.  It will make me very very happy if you are the one reading this from Maldive and leave me a comment.  

If not geographically, then what?  What I like about stats is it shows me which web page the visitors come from.  I am not interested in your on-line activities and I do not check where you come from routinely.  I only check it when I got a hike in the number of visitors.  It means someone mentioned my blog somewhere with the link to me.  In this way I now know Russian temari group talk about thimbles as well as temari and British embroidery people had a first view of Japanese thimbles. 

The other features of the stats I like is keyword analysis.  The majority is my blog name and my name, with Japanese thimbles and how to make thimbles but sometime I got something that makes me smile, like "when did photo sharing first started".   It may not have meant "my" photo sharing but someone tried search with that keyword and ended up to my blog.  Amazing.  It's December 2009, if you are interested by the way.

Saturday 14 May 2011

Peonies in Pink + thimble making mumblings

All these pictures are taken in late April and early May but I did not get around to post them until now.  Probably because of the extra harsh summer last year all the flowers are on the smaller side and less in number, but they are lovely nonetheless.

Beverly at How Sweet The Sound is hosting a weekly Pink Saturday and from her web page you can visit a lot of posts in pink.  I wish you all happy pink weekend.

I have received a quick question from Sandi about one of my "how I do" posts.  She left me a comment on the post in question as an anonymous reader so I do not have any means to get back to her except replying here.  Sandi, I am sorry to expose you like this but I really do not have any choice.  Sandi asked for my confirmation if I used a single strand of size 25 perle cotton (like DMC's six strand ones) in the post where I talked about alternatives to silk.  Yes, I did.  A strand of size 25 embroidery floss is close to the size of the silk I use for my thimble making although the cotton perle is very softly twisted that the finished thimble lacks the certain luster of the tightly twisted silk gives.  I would like to wish Sandi happy stitching and hope she would join the photo sharing this month with her new thimbles.

Pat left me a comment on the previous post about her thimbles for April on Flickr.  She showed us two thimbles, one is scales design in lovely pastel rainbow colours, and the other one in brown is called "kanoko" in Japanese.  Textile people would know what kanoko is.  It's a kind of Japanese tie dye design.  The direct translation of kanoko is a baby deer.  The design is said to be resembled the back of the baby deer.  You know, there are spots on the back of Bambi?  By the way is there a designated name for babies of deer, like puppies and cubs?  Anyway her brown thimble is called "kanoko" design. 

I have been trying to assemble a thimble starter kit for you know how long and still not finished yet.  I firstly thought to sell the kit with all the materials apart from scotch tape and machine thread with an instruction booklet for base making and how to stitch two scales design. The booklet contains a lot of photos instructions and the printing cost becomes a problem.  At the moment my draft is A4 30 pages.  One set of 30 pages takes a lot of time with my printer and as I plant to sell it, it's just not practical.  Using copier costs expensive and as my business is very very small, utilizing printing service is out of question.  So I am now leaning to the idea of PDF file so that the customer choose to print it or view it on their PC.  I know not all of the countries use the same size papers.  Does my instruction booklet cause a problem where people do not use A4 size paper? 

I have another idea.  What do you think about on line thimble making courses?  You buy a kit from me and I mail the material and send a PDF file via e-mail.  Then you join the on line group like Yahoo and Google.  You will upload your finished work on the group' photo page and we can have a discussion board over the concern/question/whatever.  I would love to hear your thought.