Happy New Year. Chloe Patricia
Thursday 31 December 2009
Last Post in 2009
Happy New Year. Chloe Patricia
Monday 28 December 2009
Cosmetic Touch-Up -- this is how I do
I hope you had a lovely Christmas with your family. Now that the holidays are over (although there is still a New Years holiday coming), you may have some time for your thimbles. So today I am going to talk about some cosmetic touch-up.
It would be wonderful if one's thimble turned out impeccable as it is, but most of the cases it needs some tidying up. There is no way to fix the stitches once the thimble is finished, but there is a way to make your thimble look prettier.
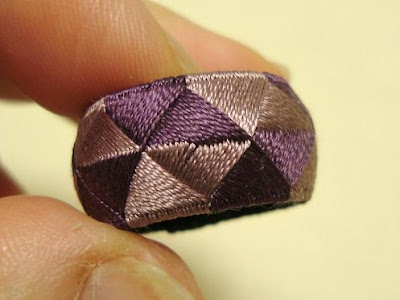 Since the stitching thread runs criss-crossing the body of the thimble like weaving, and thus leaving crossing points which should form a straight line. However these crossing points may not always be so cooperative and wouldn't leave a straight line like above picture.
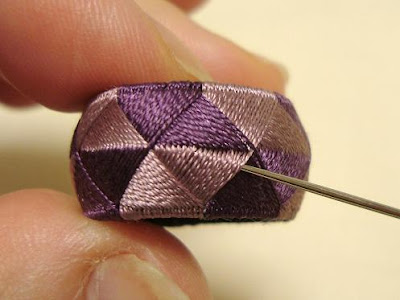 Well, what would you do about it? Pick a thick needle or very fine stiletto and insert the point of the needle between the fold of the thread like above picture, and ease the threads so that the crossing line becomes straight.
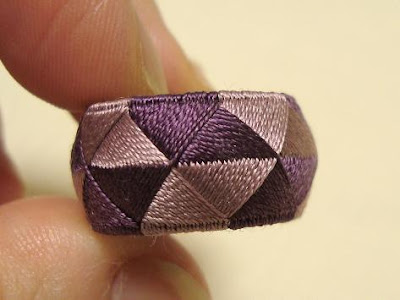 See? Much nicer. Although I firstly took this picture, then disrupted the crossing line and took the first picture above, then fixed it in the second picture, because I needed something you can clearly see, but it doesn't matter. You know what I mean to apply a cosmetic touch-up to your thimble.
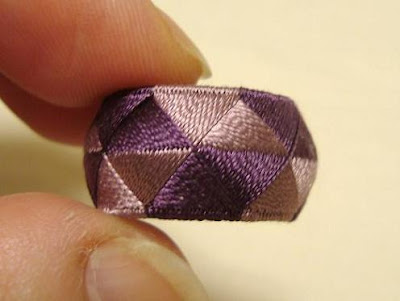 In this picture can you see where to fix, not as obvious as the first case though? This is what I got after finished stitching, no deliberate disruption like the one above. I really needed to sort this out.
 Looks much better. You can use the same needle you used to stitch for this fix but it tends to bend or break so I recommend to use a thick needle or thin stiletto, the one you use for white embroidery. You don't need to wait until you finish stitching, but you can tidy up as you go, as a matter of fact it's better you do it during stitching. However, do not over do or obsessed about it otherwise you can never finish your thimble :)
This is not about "how I do", but do you think you could be more tempted to make one for yourself if I make a, say, "your very first thimble kit" and sell it at my shop? Many people commented on my "how I do's" helpful, but if you have never seen this kind of thimbles in real before, let alone made it, you may still feel reluctant to start it by yourself? I think I would. You may not want to invest on something you may not like it enough to continue making it until you use up all the thread or bias binding or anything. I don't think I would. Perhaps a kit with one finished padded thimble base with enough thread for one thimble, maybe pre-stitched a row or two so that you just continue stitching? I will think about it and in the meantime, I am going to host another photo sharing at Flickr next month. I will post the details in January but the rules should be the same. I look forward your participation.
It would be wonderful if one's thimble turned out impeccable as it is, but most of the cases it needs some tidying up. There is no way to fix the stitches once the thimble is finished, but there is a way to make your thimble look prettier.
This is not about "how I do", but do you think you could be more tempted to make one for yourself if I make a, say, "your very first thimble kit" and sell it at my shop? Many people commented on my "how I do's" helpful, but if you have never seen this kind of thimbles in real before, let alone made it, you may still feel reluctant to start it by yourself? I think I would. You may not want to invest on something you may not like it enough to continue making it until you use up all the thread or bias binding or anything. I don't think I would. Perhaps a kit with one finished padded thimble base with enough thread for one thimble, maybe pre-stitched a row or two so that you just continue stitching? I will think about it and in the meantime, I am going to host another photo sharing at Flickr next month. I will post the details in January but the rules should be the same. I look forward your participation.
Monday 21 December 2009
Share Your Thimbles - December 2009 - closed
I have just closed the Flickr thimble pool. You can not upload from now on until I open it next year but you can admire the works from here. There are total 13 entries, from a thimble to bracelet, by 4 people. However, when I visited the Flickr I found the earlier uploads were missing and there are only 12 pictures there now. Is this because I disabled the upload do you think? Does anyone have any idea why?
To be honest I am a bit disappointed because I know for a fact that there are more than 4 people who makes thimbles/rings among my readers, but then I cannot complain as this is the first pool and it's December with winter holidays and school break and all. I am going to host another Flickr pool after New Year holiday and I would like to expect more entries then.
Now, as I said there are 13 uploads with respective comments on the post for draw. Actually there are 16 comments including 3 non-entry comments. I numbered third comment by Debi as 1 and fifth one by Debi as 2 until the last one by Debi (again) as 13 and the lucky winner is number 5, Meri who uploaded her first thimble for us. Meri, will you please send me an e-mail about which pin cushion you would like and give me your name and address. You can send me an e-mail from my profile page.
As I said before I am going to host another Flickr pool next year so please continue making thimbles/rings. Don't disappoint me, please.
Saturday 12 December 2009
Marking Paper - this is how I do
Two posts in one go, it's unprecedented but it came to my attention that you may have a problem when making a marking paper because I didn't say much about it in my "how I do's".
As I (probably) said before, the accuracy in finished design is up to the accuracy in your marking paper as well as regulated stitching. So, how do we make an accurate marking paper?
First of all, you do not use a measuring tape to measure the outer circumference of your thimble base. No, no, no, no measuring tape. It won't give you the accurate size. Instead use the paper you intend to use for a marking paper, in other word just skip the measuring and make the marking paper directly. Cut the paper in narrow long strip; I use 10mm marking paper for 11mm height core paper. Then wrap the strip of paper around the base and chop off the excess paper. Now you have your marking paper, although unmarked yet. If you intend to use the same mould, same core paper, same bias binding lining, and same thread to secure the lining, then you might want to measure the length of marking paper with a ruler for future use since your thimble bases are supposed to be in the same size.
Then you need to segmentalize it. The easiest way is like below picture.
 It's about parallel lines I was taught in geometry class but I cannot remember what it's called. You draw the parallel lines in the same intervals on a paper and place one corner of the marking paper at line number 0 (I haven't numbered 0, though, in the picture), and the other corner at the line with the number your segments would be (mine is 14). Then mark the paper at the parallel lines. Repeat the process for the other side and you got your marking paper segmentalized.
This is how I do, it's easy and accurate but not the only way. If you are comfortable with another way, then stick to it and tell me how you do. I may convert to it, too.
As I (probably) said before, the accuracy in finished design is up to the accuracy in your marking paper as well as regulated stitching. So, how do we make an accurate marking paper?
First of all, you do not use a measuring tape to measure the outer circumference of your thimble base. No, no, no, no measuring tape. It won't give you the accurate size. Instead use the paper you intend to use for a marking paper, in other word just skip the measuring and make the marking paper directly. Cut the paper in narrow long strip; I use 10mm marking paper for 11mm height core paper. Then wrap the strip of paper around the base and chop off the excess paper. Now you have your marking paper, although unmarked yet. If you intend to use the same mould, same core paper, same bias binding lining, and same thread to secure the lining, then you might want to measure the length of marking paper with a ruler for future use since your thimble bases are supposed to be in the same size.
Then you need to segmentalize it. The easiest way is like below picture.
This is how I do, it's easy and accurate but not the only way. If you are comfortable with another way, then stick to it and tell me how you do. I may convert to it, too.
--- --- --- --- --- --- --- --- --- --- --- --- --- --- --- --- ---
Meri asked me about the distance between the parallel lines. Actually it doesn't matter really as long as all the lines are parallel but I would suggest for you to try 5mm firstly and see if you like it. When you use 50-60mm mould for 8 to 12 segments, 5mm intervals works just fine. If you require more segments, like 24, or even 36, then the distance between lines has to be smaller. Hope it's clear now and if you need further clarification, please don't hesitate to ask. Thank you. CP
Friday 11 December 2009
Share Your Thimbles December 2009 - part II
Now, I would like to thank Meri in Portugal who responded firstly to my call, Pat for becoming the first member, Debi for uploading the first thimble, and Gloria for her kind word. We are now a group of four including myself and I would like to make some points clear:
Firstly, you can use any kind of thread you like. It does not have to be silk. You can use anything you like or you have in your stash. You can choose two different kind of thread for each colour although it may cause you some problems if the size is visibly different. The reason I asked you to state what you use when uploading is so that we can share the idea of what works well.
Secondly, the design is two coloured scales only. No shading in colour or stripes. Basically you can only use two solid colours. The variegated thread is okay if you like the effect though. The reason why I limit the design to two coloured scales is to encourage everyone to join the pool. If I allow the more complicated design and it's most likely the more experienced people will upload their works firstly, then the other people, who are less experienced or who are making their very first thimbles will not feel very comfortable to share their works. I intend to continue hosting the programme and I may open to more complicated designs like my pin cushion above in the future. Until then, it's two coloured scales.
Thirdly, you only have to leave a comment when you would like to enter the draw. One entry by one comment for one upload. Even if you uploaded multiple thimbles and left only one comment, then it's one entry.
Lastly, the closing date is 21st of December. Please note that I live in Japan and it's 9 hours ahead of GMT here. I am sorry but I cannot give you the exact time when I will close the pool. Most likely in the evening is all I can say.
I hope I made everything clear and wait for your participation.
Happy stitching.
Monday 7 December 2009
chocolate covered strawberries
Wash strawberries in a cold water and dry them thoroughly with paper towel. Chop your chocolate finely, finer the better. Put them in the bowl and put the bowl over the small pan with hot water until half of the chocolate is melt. Remove the bowl from the pan and stir well until all the chocolate is melt. Dip strawberries in the chocolate. Do not put them in the fridge, the chocolate becomes too hard and loose it's beautiful luster. So essentially you cannot prepare them in advance but it won't take much time. Just wash the berries and store them in the fridge, and chop the chocolate in advance. Just before serving, put the chocolate over the pan of hot water and dip your strawberries. Since the berries are kept in the fridge, the chocolate will very quickly set. Enjoy!
Tuesday 1 December 2009
Share Your Thimbles - December 2009
Following the previous posts about how to make thimbles, it's a great pleasure for me to announce that I have launched the first ever Share Your Thimble photo pool at Flickr. This is the scheme where everyone can upload their thimbles for any one's views; this is open to public, both participants and viewers. You can jump to Share Your Thimbles from here although at the moment there are only one picture there.
This is to promote traditional Japanese silk stitched thimbles and to encourage everyone to start making their own. There is only two rules; firstly it has to be a thimble you yourself made which can be uploaded. I don't think anyone would steal someone else's work but just in case. Secondly you will state the circumference of the mould you used, the material you used for the padding, and the kind of thread you used in the description field as you can see in my picture. Other than that, you can upload as many as you would like.
Here is how it works in case you are not familiar with Flickr; as a matter of fact I was not and I still am not, though. As far as I understand, firstly you have to create your own account. Since I had already had Yahoo account, I didn't need to enter much details and I don't think if you do not have Yahoo! ID to start with, it won't require much. Then, upload your photos and when you open the uploaded photo, there is a "send to group" button between the title and the picture.
As this is the first pool, I would like to limit the design to bi-coloured scales only. As I told you before this design is the easiest and at the same time the most difficult one so it's a challenge for everyone, from the very first time beginners to the very skilled thimble makers. To encourage your participation, I am offering a give away. When I close the pool on 21st of December, I will draw one lucky person who can choose one small pin cushion from my Etsy shop, on the condition that s/he will not sell it away. At the moment there are 17 there and even if, and it's a big if, I made big sales, I would make sure that lucky person could chose from at least from a dozen. To enter the draw, please leave a comment here, to this post, that you have uploaded your thimble. One entry per one upload, so if you uploaded two photos, then you have to leave two comments for two entries. Please note, this is not a competition, but a simple draw.
Closing date is 21st of December, three weeks from now. I know for a fact that some of the you are thimble makers and some of you are thinking of making one. I would be greatly disappointed if you won't participate in. This is open to anyone, so please tell your friends and invite them for me.
Sunday 22 November 2009
bi-coloured scales design thimbmle - this is how I do -
As promised a long long time ago, here is a tutorial of making bi-coloured scales design thimble. Before I proceed, I would like to thank Neabear, coral-seas, SunshineCraft, Debi, and Mary Corbet for responding my enquiry earlier regarding segments and sections. I also consulted with other sources and they all agreed that there is no big difference either I call them segments or sections. Considering that I have already used the word segments in the previous posts and I do not wish to change all the words, I will stick to "segments" for the time being until I may decide otherwise in the future.
Now, since this bi-coloured design is what most of the people makes firstly before trying other designs, it is considered the easiest to make (or perhaps it's the other way around, it's easiest and people makes them first) however, it's quite a tough design to make. First of all, as you use only two colour without fancy design, it clearly shows your skill. Secondly segments are relatively wide so your padding may be caught with your stitching threads. Still it involves only two threads with no changing colour in one segment, I chose this one for my first design tutorial.
As I told you before scales design is collective triangles in Japanese culture, signifying serpents or dragons scales. Dragons in Eastern Asian culture, contrary to the Western world, are nature's spirit or gods wielding a great power over the weather and water such as ocean and river. You see, dragons don't breath fire in Eastern Asia. I will not going further here but you can find books about Eastern dragons in the anthropology section at your local library. Back to the thimbles. This design is simple yet elegant, suitable to your very first thimble.
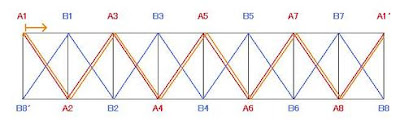
Here is a diagram. Rectangles with crossings in red and blue with numbers and arrows. But this tells you how to make your thimble.
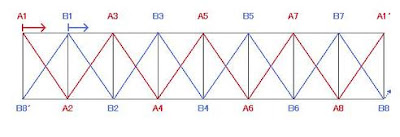 I would like you to consider diagrams are instructions on your marking papers. Those eight rectangles are segments as you see below and I numbered with A's and B's alternatively both at top and bottom. As your marking paper is wrapped around the thimble base, A1 and A1', and B8 and B8' are the same point.
  Then the arrow beneath A1 is to signify your first starting point is A1 and the direction you take is right, means regular forward stitching. You are going to make your initial stitch at A1 and then forward to A2 then A3, zig-zaging until you would get to A1' which is same as A1 where you make your first stitch of the second row right next to the initial stitch.
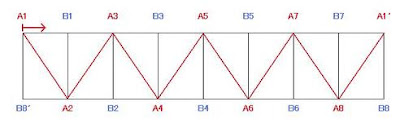 Then you thread another colour and starting from B1 to B8', then B1 again with the first stitch of the second row as the below diagram show you. After both of your first rows are done with first stitches of the second rows, you get back to the colour A and start the second row, ending the row with the first stitch of the third row.
 In order to make it clear I change the colour of the second row of colour A. For some unknown reasons I cannot upload any picture file bigger than 500 pixels wide, so it does not clearly appear as I wished.
Once you finished your second row of the colour A, it should be like below,
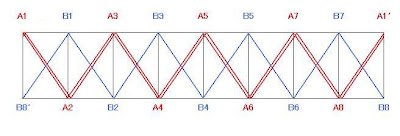 Then thread the colour B, and make stitches all around.
 Continue stitching colour A and colour B alternatively until all the segments are filled with stitches, thus the body of the thimble is covered, too.
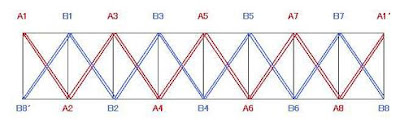
When using a lip balm casing for a mold as I do, I recommend to have 8 or 10 segments. Any more, the finished triangles are too steep and do not look like scales (as Japanese people consider the way they should be) and any less, you might have a problem covering edges and body at the same time. It may not make sense to you right now, but take my word for it, you do not want to have this particular problem now. Be aware that your segments are always in even numbers for this design. You cannot make scales with odd numbered segments while some designs, like blue waves, can be made with both odd and even numbered segments.
Let me know when I didn't make it very clear and I will try to explain more clearly. Those of you who are wondering how to make stitches and thimble bases, you pop in here for making bases, here and here for stitching, and here for suggestions of silk alternatives.
Happy stitching!
Thursday 19 November 2009
somthing small and cute
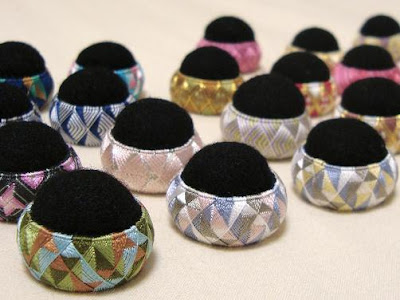
I have finally got around to make enough small pin cushions and I will list them at my Etsy shop over the weekend for early winter holiday shopping. I am deeply ashamed of myself of being a very poor shopkeeper, I have so neglected my shop that there are only two bracelets and a box of silk thread left now.
Aside from my thimbles and pin cushions, I am working on a needle book however, so far no success at all. I wonder if I could perfect it in time for winter holiday season. I will try a few times more and see how it goes.
Saturday 7 November 2009
long time no see ...
Here is my latest creation. I made this slightly bigger than my usual thimbles thinking to turn it to a pin cushion. I also neglected my Etsy shop, too, and hopefully soon I will restock it with new thimbles and pin cushions including this one.
Now, I promised you that I would explain about the thimble design and segments a long time ago. I haven't forgot it, I wrote a draft, then rewrite it, discarded it, then made a new draft, revised it, then discarded it again and repeated the same process a few times and have finally concluded that no matter what I say, it will not make any sense if my readers never made one for themselves. So I am now drafting "how to make a thimble for the first time" instead and will soon post it here.
In the meantime, I have a question for you. I use the word "segments" to describe the sections divided on the marking paper and wonder if it is a bit too big a word. I come up with "part" and "section" and I would appreciate it if you could suggest the appropriate word for me since English is not my first language.
Monday 14 September 2009
Gold Is Addictive
Wednesday 19 August 2009
metal thread 2
Friday 14 August 2009
metal thread
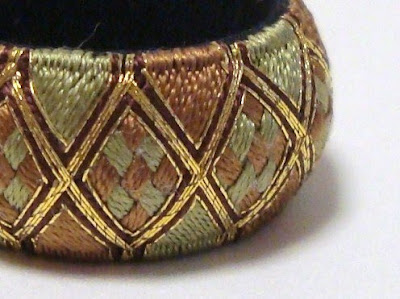 One of my instructors at the Japanese embroidery course has suggested me to use gold thread instead of my usual substitute of pale yellow for framing diamonds design. The gold thread I use is a real gold one; thin gold leaf strip wrapped around the silk core thread, and not the fake polyester one. That means it is so delicate that the gold is really easily coming off.
This one, and the one below, are not in my usual thimble size. It came to my attention (belatedly) that there are people who likes the bigger pin cushions than the one I think is big. I do not do dressmaking or quilting or any other heavy sewing and do not require a big pincushion, and naturally my idea of big does not coincide the one for the heavy users. Therefore I am going to renaming the size of my pin cushions. These two you see here are "extra small" ones (although they still require cushion part), slightly bigger than the thimbles. My former big pin cushions, which are still on my Etsy shelves but soon to be expired, will be "small" and napkin ring size will be "medium". I am still wondering what "big" should be, though.
Monday 20 July 2009
Second Bracelet
 This is my second bracelet attempt. Although I finished this a few month ago, I haven't posted it here or put it on the shelf at Etsy with no particular reasons.
 Since the ring is rather big (naturally because it's a bracelet) it took me quite long to finish it, not only because physically it was big, but also stitching became boring. Well, boring may be too strong a word. Perhaps monotonous?
I have at the moment three unfinished napkin ring sized rings which supposed to become pin cushions, all at "a little bit more and being finished" stage. When colours I chose didn't appear as I expected, or when the design was not I thought it would be, I just cannot bring my self to continue, it seems. I simply put it aside and started a new one but then next one didn't turn out the way I expected it and .... I WILL finish them all, this week, NO MATTER WHAT, just to prove that I could, to my self.
By the way I have commenced the summer sale at my Etsy shop. Since the listing period of the thimbles was expired there are two bracelets (including this one), napkin rings, and several pin cushions at the moment. I plan to add some more, especially thimbles to the listings, plus these pin cushions once they are finished :)
Wednesday 15 July 2009
Alternative to Silk - this is how I do -
It has been quite a long time since my last post and I am really sorry about that because I know there have been a lot of people who checked on my blog to see if there was something new. It's just that things kept happening one after another while they were not serious, they required a lot of my attention.
Now my first post after a month's absence is about alternatives to silk padding and silk thread. Most of the time when I make thimbles I use silk padding however I am aware that it is not always easy to find silk padding outside Japan. They are uncombed silk fiber formed like a sheet and stretch really well so that it's easy to handle and form a suitable padding to the thimble bases, plus they have a certain weight to give the thimbles sturdiness. However they are a bit costly even here in Japan and therefore when I make bigger rings like napkin rings or bracelets I need alternative to silk padding. The answer is cotton padding. I am not a quilter or a dressmaker so I do not know much about the fabric but there seems a few options where cotton padding are concerned and I recommend to buy the lightest one at the shop because you can always apply the second layer for the extra thickness.
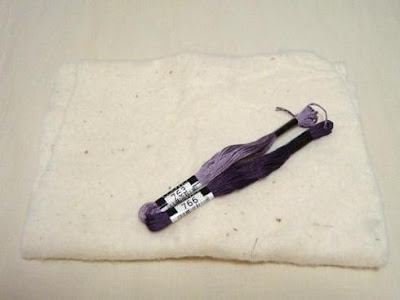 As for the thread, most of the thimble makers in Japan use silk hand sewing thread size 9 however, you can use any thread you would like or you have in the stash. Today I use a strand of 6-strand embroidery floss, size 25. These embroidery floss are similar in size to silk hand sewing size 9 but lightly twisted therefore the result is not the same. Still it works, I think.
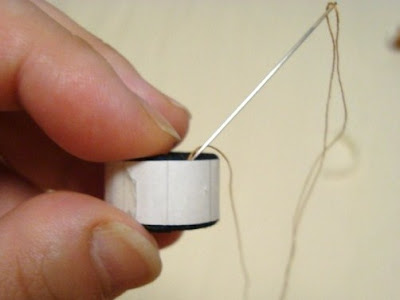 I start with the finished ring base with a marking paper on it. Just in case, you can see here how I make my thimble bases. I use orange thread today so that you can see clearly what's going on.
 The thread you see here is the one I used to stitch the edges of the bias binding together. You lead your thread to the surface of the marking paper, avoiding the bias binding overlapping part.
 Roughly wrap the cotton padding around the ring. I secured it with the needle only to show you what I am doing and you don't need to do this.
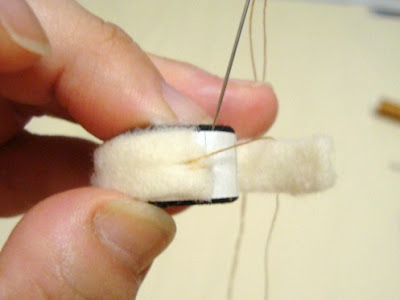 You are going to sew the end of the padding on the marking paper. Make your first stitch to secure the padding on the ring, and then sew the other end to the first end, too.
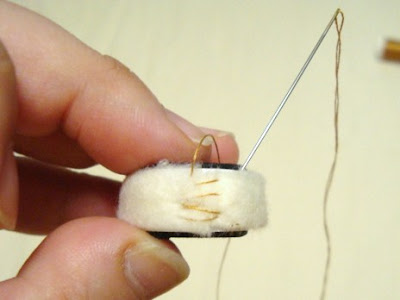 Until the ends are sewn together. These stitches will not show once the thimble is finished so you don't need to worry about it too much.
 Now you are going to put tacks. You can skip tacking but it makes the later work so much easier.
 Make stitches on the padding to secure it on the marking paper. Be sure you sew not only the padding, but the paper, too.
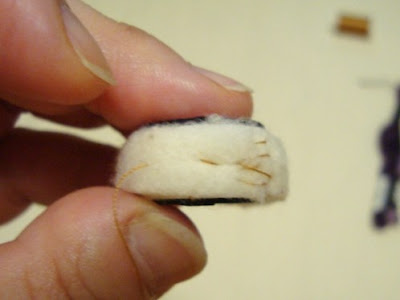 Make sure to sew the padding tightly. The main object of tacking is securing the padding but it also minimal the bulkiness.
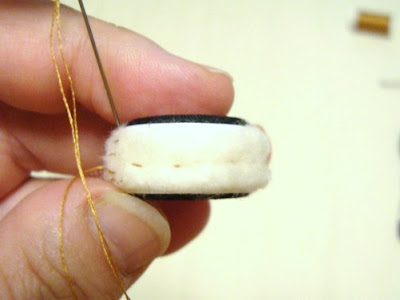 Now you have put the tacks all around...
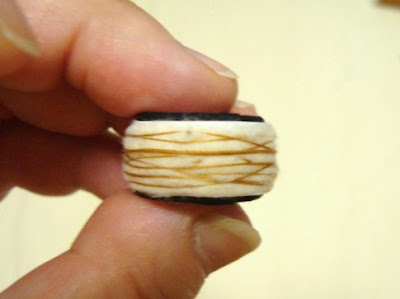 and are going to wrap the rest of the thread around the padding, so that it snugly wrap the base. Again, try to minimize the bulkiness of the padding, especially both top and bottom part of the ring. If you need the thickness, then apply the second and third layers. When you got familiar with the procedure you can use the long strip of the padding and wrap it around twice or three times, but applying one layer at a time is much easier.
The thicker the middle of the ring, the more plump and generally more cuter the ring looks, however, you might want to try the single layered padding firstly because the pot-bellied ring is difficult to stitch.
 I am working the simple two coloured scales design using cotton embroidery floss. You can still see the orange thread I use for tacking but it won't show once it's finished.
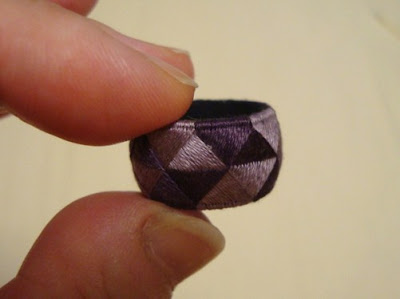 It's much slimmer than my usual thimbles and because the embroidery floss is not as tightly twisted as the silk thread and it's cotton instead of silk, the thimble lacks a certain luster I have to admit, but it still works.
 You can use polyester padding if you like but they are too light to my taste, and there are people who wrap thread around the base in place of padding until you archived a desired thickness. Perhaps wrapping thread is easier than dealing with cotton padding but I find the finished thimble rigid but they are my personal opinion. As for the stitching thread, cotton perle or button hole thread might work well although they are bigger in size.
I am still working on how to best explain the segments and design. I will hopefully soon finish and post it here.
Now my first post after a month's absence is about alternatives to silk padding and silk thread. Most of the time when I make thimbles I use silk padding however I am aware that it is not always easy to find silk padding outside Japan. They are uncombed silk fiber formed like a sheet and stretch really well so that it's easy to handle and form a suitable padding to the thimble bases, plus they have a certain weight to give the thimbles sturdiness. However they are a bit costly even here in Japan and therefore when I make bigger rings like napkin rings or bracelets I need alternative to silk padding. The answer is cotton padding. I am not a quilter or a dressmaker so I do not know much about the fabric but there seems a few options where cotton padding are concerned and I recommend to buy the lightest one at the shop because you can always apply the second layer for the extra thickness.
The thicker the middle of the ring, the more plump and generally more cuter the ring looks, however, you might want to try the single layered padding firstly because the pot-bellied ring is difficult to stitch.
I am still working on how to best explain the segments and design. I will hopefully soon finish and post it here.
Wednesday 17 June 2009
Silk Hand Sewing Threads
Storing in these boxes as they are is a temporary solution. They are the boxes the Sacher Torte came in and they are beautiful enough that I could not throw them a way but rough around the edges literally and I have forever been planning to do make over. Since I have found what I want to put inside, I have now no excuse not to prioritize it on my very long "to do" list. Hopefully soon, they will be reborn as fabric covered boxes with much neat divider than the one they are currently equipped.
Saturday 30 May 2009
World of Pink - roses
Thursday 28 May 2009
Blue Wave with Fins
 Here is a set of napkin rings I kept bitching about. The original blue wave design (the second one from the left) was not so bad but the rest of the five rings all required weaving and it was just too much.
Subscribe to:
Posts (Atom)

