Friday 1 October 2021

Other Variations of Bi-Coloured Scales Design

It has been quite a long time since my last post and it's October now.  I meant to post this sooner, actually I have started this post at the beginning of July but I have been a bit busy..... well, no excuse.  Here is another variation of of bi-coloured scales design.


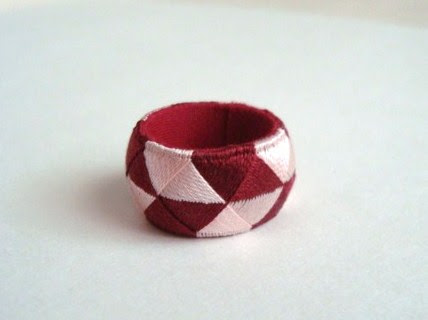
This is a very simple design with a single colour for both stitching paths and a contrasting colour at the mid-point and last of the section.  However, if you stich as if it's a good old bi-coloured scales design and switch the colour of the thread at the mid-point and switch back to the original one and continue stitching until the section is filled with stiches except for the last row of the stitch for which you switch to the contrasting colour again, your thimble appears like below:
The difference of the designs between top photo and the above design diagram comes from the way the threads layer each other.  When you make a new row of stitches, the thread travels on the thimble body and it layers on the existing thread(s) and form the design.  And so, the contrasting colour at the mid-point does not appear fully as the design of the thimble does in the photo because the latter half of the threads in the original colour lay on the thread of the contrasting colour.
Now I am going to explain how to stitch the thimble in the photo.  Start stitching as usual and stop one stitch before you got to the mid-point and finish the thread.  You have to know how many stitches you make in one section so that you will know when to stop stitching for this design: 
= "total number of the stitches in one section" / 2 - "1 stitch"
In the diagram above, it requires total 20 stitches to fill one section so I made nine stitches. 20 devided by 2 and minus 1 makes 9.
Start a new thread leaving a space for just one stich.
Continue stitching until all are filled with stitches but a tiny space for the last stich.  You are going to make the same number of the stitches for the second half of the section and it automatically give you a space for one stitch.   In the diagram above, I made another nine stitches.  There are four spaces left in two sections (two stitching paths), 2 at the mid-point and another two at the last.  
Start a new thread in the contrasting colour and start stitching for all four spaces and you will get your new thimble now.  You can compare the above diagram with the top one and see in the top diagram the latter half of the blue threads covers the half of the first yellow thread and it makes a big difference on the finished thimble.

Some of you may wonder if you could make the same design by having four stitching paths in the same colour with a contrasting colour for the last stich, instead.  The answer is YES.  Well, sort of, not totally the same but quite similar.
See?  It looks quite similar, but not THE same.  However, it does not much of a difference.  The effect is (almost) the same. 
This is not bi- but quad-coloured scales though all four sections are in the identical colour scheme.  In this way you stich four stitching paths in the same colour and switch the colour just for the last stitch.  It's certainly more easier than stich the design as bi-coloured scales. 

However, stitching as bi-coloured scales and quad-coloured scales have a big difference.  Firstly you only have two working threads at one time for bi-coloured, while four for quad-coloured.  Having four is not a big deal, but how about eight, or perhaps sixteen?
The above diagram is a quad-coloured scales with the technique of stitching the mid- and last stitches lastly.  You can of course stitch this as oct-coloured, I mean, 8 section design period.  The design period is the number of the sections where the thread travels from the top to bottom and then up to the top again.  In this design the tread travels total eight sections, that is, 8 section design period.  I believe I have posted about the design period and design repeat in the past.  Having eight working threads is not very easy to handle especially all are in the same colour because you have to make track of which stitching path you are working with all the time, and more importantly, what you are making is a ring sized object.  Working on the ring sized object with eight threads hanging is NOT easy at all,I can tell you.

-------

Lastly, I would like to thank you all who bought my "First Thimble Kit" via Etsy.  If you are interested in the kit, there is a link to my Etsy shop on the right column.  I am sorry but at the moment I cannot ship it to EU countries through Etsy due to their new duty declaration system.  If any of you who lives in the EU countries and would like to buy the kit, please kindly contact me.  My profile page has my email address. 
 

Thursday 13 May 2021

Bi-Coloured Scales Design Variations


I mean to post at least twice monthly but it has already been more than a month since my last post.  Time flies indeed.

I talked about the monotonous work when making bi-coloured scales design thimbles in my last post and the magic solution is colour variation.  It does not necessarily mean to encourage you to buy new thread in different colours but the colour placement on the designs.

Here is one example.  When you got to the half point of the section when stitching the bi-coloured scales, just switch the colours for one round. 
Then switch back to the original colours and keep going until finished.  It's just one round of stiches but it makes a big difference as shown below.
Or you switch the colours altogether from the halfway point.  Your thimble will look completely different from the bi-coloured scales, as you see below.
Perhaps you may want to try stripes.  Add two stitches in the colour for the second stitching path when stiching the last part of the first path and your thimble will look like this.
Or stripes in both paths and it looks rather different.

From here the design called Blue Wave (Seikaiha, in Japanese) but it's one of the variations of bi-coloured scales.  It's actually bi-coloured scales with stripes.
As before you can make stripes in both stitching paths and ...
Until now I chose the different colours for two stitching paths but if you choose a single colour for both, it looks like this...

I am thinking to assemble a new kit to sell at my Etsy Shop, so that the people who are new to thimble making can still working on the thimbles after "Your First Thimble Kit".  It will be a kit with a few of the finished thimble bases with two round of stitches done, a needle, and threads.  What do you think of the idea?

In any case, please keep counting the number of the stitches in one section and try to make the same number of stitches every time you make thimbles.  It will help you to explore new designs.  The stripes designs above require the exact number of the stitches to make even stripes, though uneven stripes are fun, too.  However, there are designs which have to be exact and I will show them in my next post, hopefully soon. 


Sunday 4 April 2021


This design is called bi-coloured scales, the most basic of the thimbles.  Here are the step by step diagrams to show you how the design is formed as you stitch:

This is the first stitching path of the first row.  You just stich from the top side to bottom and then go up to top again.  The above diagram only has six sections so that it becomes easy for me to draw but it can be eight or ten, or even more, depending on the size of the ring base you use as long as it is even number.

Here, you have stitched the second stitching path of the first row in light blue, in the same way you did the first stitching path.  The light blue thread lies on top of the green thread of the first stitching path.


Then this is for the second row.  You can see the crossing points are forming as you go.

 
The second rows are done.  By the way, the thimble base included in Your First Japanese Silk Thimble Making Kit has two rows of stitches done and you are going to start stitching from the third rows shown below.


This is the third row, both paths are done, and you can see the vertical line forming at the crossing points.


One quarter of the sections are filled with stiches and...


Now a half of the each sections is done.  You can see the forming design.


All the sections are filled with stitches and you have your bi-coloured scale thimble in your hand.

If this is your very first thimble and maybe you are not very happy with the thimble you have just made but it's true that practice makes perfect where thimble making is concerned, or practice makes nicer ones, I should say.  The more you make, the nicer, neater, and more beautiful ones your thimbles become.

I also recommend to use the same materials; the lining fabric, paper for the base,  and marking paper, on the same tube as a mould so that your thimbles are always the same size.  Why?  So that you can count the number of the stiches in one section.  Why should you need to know the number of the stitches in one section?  Because it becomes easier for you when you work with the new designs.

The problem of keeping making bi-coloured thimbles is it's monotonous, though the design is simply beautiful.  My answer to that particular problem is colour variation and I do not mean to encourage you to purchase new threads in different colours, though it would be more fun for you to have a stash of threads.  What I mean is colour placement and I will explain it in my next post.  

Friday 5 March 2021

Thimble Design Diagram Finally Completed


Finally I finished the design diagram I have been working on.  This is the diagram of the thimble I posted early last month.  The thimble itself is on the book I checked out from the library and following the instruction I was able to finish it relatively easily.  However, drawing the design diagram was a completely different story.

I am not good at digital things.  I wanted to try some fancy drawing software but I ended up with good old Paint.  I drew the diamond grid pattern and filled each cells with colours.  It was a tedious work and took very long to finish but what it took me so long was for me to understand the design itself.

I made the thimble so I should have understood how to stitch to form the design but I did not.  It was a very good experience for me to fully understand the design.

As you enlarge the above diagram, you can see how the stitching threads travel and which travels on (or beneath) which threads.  Most of the design diagram on the books, if not all, are just rectangle divided by vertical and  diagonal lines and colour-blocked.  You cannot see how the threads layer each other.

I am now working on the step by step diagrams.  Actually I made copies of the image while working and hopefully I could finish them up sooner so that you could stitch the thimble, too.

Lastly, it's the same image but I will show you the finished thimble here again.  I am sorry but I placed it upside down in the photo and you may have a little difficulty to compare it with the design diagram to understand how to stitch.


Wednesday 17 February 2021

Your First Japanese Silk Thimble Making Kit

 I have just posted 5 of “Your First Japanese Silk Thimble Making Kit” at my Etsy shop.

https://www.etsy.com/your/shops/MaMercerie/tools/listings?ref=seller-platform-mcnav

Due to the decreased international flights because of Corvid-19, please contact me BEFORE placing your order so that I could double the postal service situation from Japan to your country.  

Thank you.

Monday 8 February 2021

Time flies...


I have finished this thimble more than a week ago but has not got around to post it here.  The major reason was I wanted post it with a design interpretation and have still been working on a design diagram. I don’t think it would be ready anytime soon, so this post is just a photo of the finished thimble, only.

Monday 11 January 2021

First Thimble of the Year


Here is my first thimble of the year.

Skill Level:  Intermediate

Required technique(s):  Forward stitch and back stitch

Number of stitching path(s):  Four then later two

Design period:  Four sections

Design repeat:  Four sections

Number of round(s):  Single

Number of colour(s) used: Five


My original design choice was Nine-patch Diamonds in red and white as these colours represent celebration in Japan however, I have too many of them in my stash and I wanted something different. It turned out all right but the black lining is just too strong a contrast for the pastel hues I chose for the design. I almost always choose black for lining because matching the lining colour to the threads colours is not very easy especially as I use readymade bias binding tape.  


When I had selected four threads from my stash I thought they would work but no, they did not. Putting the thread cards (silk hand sewing thread comes on a card, and not on a bobbin) side by side does not always guarantee that you made a right colour choice.  You have to stitch them to make sure these are what you want.  Unfortunately the light beige I chose does not work well with the light lavender.  They are too similar hue when stitched next to each other and that is why I had to stitch the additional round in white. But all in all it turned all right I suppose.