Tuesday 30 March 2010

Share Your Thimbles March 2010 closed

Thank you for your patience for waiting more than a week to hear my announcement of the closure of this month's photo sharing and winner of the lucky draw. We have 24 lovely thimbles, bracelets, and a pincushion this month and six people left a message on the discussion board (although there are seven messages and it was because Debi left two)


Now, a lucky winner is Surya in Malaysia who shared her shaft feathers design bangle in pink and yellow. As she said in her message left, it's a quad-scales design using only two colours, so you can call it quad-scales but more commonly called as shaft feathers, as in a long bow's. Surya, please send me an e-mail for your shipping address. You can send it from my profile page.


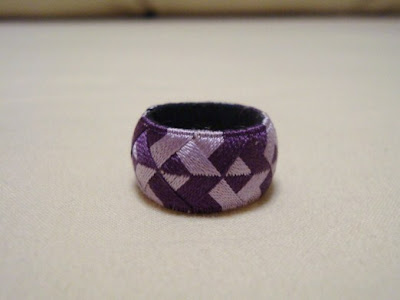
These are my recent ring bases for pin cushion. They are nothing to do with this post but I think it's always nice to have a picture to share, so here it is. I suppose you remember that I have started to sell "your first thimble making kit" at my Etsy shop. So far I made 22 sales and the responses from the people who bought it were favorable and a few people asked me if advanced kit(s) will be available in future. When I first thought of selling thimble kits I planed to have two kits; "first thimble kit" and "beginner's starter kit". The former one is what on the shelf of my shop now, a finished thimble base with two rows of stitches already done. The latter one, a starter kit, should include all the key materials such as core paper, bias binding, silk threads, floss silk padding, and so on with instruction booklet which shows you how to make a base, how to pad it, and how to stitch. You can make at least three thimbles using the material included. That was a plan. Now I have become ambitious and dreaming of a "thimble of the month club". The first month's thimble will be very similar to the "beginner's starter kit" and from the second month and onward, you will receive a design diagram and instruction with maybe two cards of thread every month, perhaps a 6 months subscription. In this way the people who are new to thimble making can gradually familiarize themselves and learn more complex designs, too. In any way it certainly takes a few months before I can produce a new kit for you. In the mean time, I would appreciate your input in this matter.

I will start a new Share Your Thimbles the day after tomorrow. Happy stitching!

Saturday 13 March 2010

answers to recent questions - a kind of how I do -

This is my second post today. If you are visiting for Pink Saturday, please scroll down for the previous post. Thank you.


I am ashamed to admit that I am very slow at responding to the comments left. I love it when people left messages here, even just saying hello, and believe me, I read them all.

More than a week ago, Pat asked me how many sections the prize pincushion for March had. It has 10 sections. You just start a thread and go stitching all the way until two sections are filled.

Before you start, you have to know exactly how many stitches you are able to make in one section if you want precise stripes.


The number of sections does not matter as long as it's even number. However there won't be a thread B so you may find it a little difficult to maintain the round shape of the ring, especially when floss silk or quilting padding were used as padding material. I suggest to put basting stitches where thread B should be and between B and A, just one row of stitches each with finer thread than your stitching thread. Just keep stitching as if there are no basting thread running across the body of the ring and when you filled half the section with stitching thread, then remove the first basting stitches. Just nip the thread at several spots and remove it. When you filled a full section then remove the second basting thread. If your stitching threads laid on the body of the ring were disturbed, then you can always tidy it up using the tip of the needle (I recommend the bigger needle than you used for stitching) or a very fine stiletto, like the one used for white embroidery.


This morning just after I published the previous post, Rebbecca asked me if I marked more divisions other than usual markings for section divisions as a colour change guide. The answer is no. I didn't but you can if you like. But you really don't need the extra markings because the other part (dark blue and white stripes part) requires you to know exactly how many stitches you have to make in one section, so you can tell when to change the pink threads, too, without markings. On the other hand you might find the extra markings half way between the original section markings useful, though, so that you could make the stitches evenly.


Lastly a person who chose to be nameless left a comment on the post explaining how to make stitches a few days ago. She (I call the person she) said that when finishing the thread, the picture looks like the needle is going down behind the marking paper and if her interpretation is right, and that when starting the new thread whether it come up in front of or behind the paper. I do not know whom to thank, but thank you for binging this up to me. They are indeed very good questions.

I believe this is the picture in question. It is not very clear where exactly the needle tip went and I apologize for it.


The answer to the first question is neither. The needle has to penetrate the the lining fabric at the exact place where you are supposed to make another stitch and going down through the fabric (try not to nick the core paper) and coming up penetrating again the fabric, marking paper, and the padding as shown in above picture. Otherwise, when you pull the thread through regardless it's in front of or behind the paper, it burdens the existing thread already laid on the padding.

The answer to the second question is, I am sorry to say it again, but neither. Your needle will go in through the padding, marking paper, and lining fabric, and come up where you want to make an initial stitch, and you pick the lining fabric again to make an actual stitch. Without penetrating the lining fabric, your initial stitch can be loose and you won't want that.

I am sorry I didn't make these points clearer when I explained about the stitching first time. When you find anything unclear, anything at all, please let me know. As I told you before, I may be slow to respond but I read all the comments left.

Cherry Blossoms

There is a wonderful group programme called Pink Saturday hosted by Beverly where the participants publish a blog post dedicated in pink on every Saturday. It has been a while since I last participated in but when I made this ring as a frame of a small pincushion I decided that it was time to join the group again.


As you can see, this design is an another variation of bi-coloured scales. The first section is shading pink and the second section is dark blue and white stripes. I suppose the darkest pink turned out a tad too strong. I am going to make another one and I will increase the pale pink part and reduce the darker two, perhaps it might work better with paler yet pink.

Wednesday 3 March 2010

Share Your Thimbles March 2010 - Part II -

The above pin cushion is the prize for this month's Share Your Thimbles. To enter the draw, once you uploaded your thimble photo(s), please leave a message at the Flickr, not here. I made a slight change this month and you can enter the draw only once while you can upload your photos as many as you like. The closing date is 21st of March, 2010, Japan time. Please note that we are 9 hours ahead of GMT in Japan. For those of you who live in the area on the Western coast of American continents, the closing date is almost 20th, instead of 21st in your time.

The design of the above ring can be made using forward stitches only. I changed the colour randomly but precise strips looks very smart. It's easy but you might need a few practice rings before you become happy with the result. The bi-coloured scales design has two starting points, and you change the thread alternately when you go. This design only has one starting point and no thread change unless you want to make strips. So your padding, whatever you use, may interfere while you make stitches, and you may feel difficult to maintain stitch consistency. Do I make sense? Any question and let me know, please.


I would like to thank you all who encouraged me when I first thought about making a kit and selling it at my shop, especially Debi who helped me to put the instruction booklet together, without her help, it wouldn't have been such a nice and helpful booklet. She agreed to edit it and not only corrected my wordings but also added invaluable tips.

Five people bought my thimble making kits so far and I am very happy that they are going to start making their own thimbles or any other rings using the thimble making technique. I won't say it's easy but it's not as difficult as it looks or as you think it would be. I have added another five kits on the shelf of my Etsy shop. If you are interested, please pop in and have a look.

Monday 1 March 2010

Share Your Thimbles - March 2010

Now, it's time for you to start making silk stitched thimbles as I am hosting another thimble sharing Flickr group. You can upload your photo from here.


Basic rules are the same as the previous months, but I have made a slight change:

1. You have to make your own thimbles to join the group. However you can use the finished ring base from the kit.

2. You can only use forward stitches. No back stitches or weaving.

3. You can make your rings in whatever size you choose, from a thimble to a bracelet.

4. You can use any material in any colours. Please state the size of the mould, padding, thread in the description.

5. You can upload as many as you like.

6. The closing date is 21st of March, 2010, Japan time. Please note that it's 9 hours ahead of GMT in Japan.

As before, we are going to have a happy draw after closing on 21st of March, and the lucky winner will get one of my small pin cushion. I am sorry but for some reason I cannot upload a photo of it. I will try later again.

In order to enter the draw, you must leave a message at the discussion section of the Flickr, not a comment here. Another change regarding lucky draw is you can now enter only once. So however many photos of your thimbles you uploaded, your entry to the draw counts as one.

These two photos are design suggestions, slightly varied from the bi-coloured scales design.


When you went to the half way point, change the colour for the rest of the section. I used two colours but you can use four and it makes it an interesting design.

You can figure out how to make this design by yourself so I won't go further, but actually it's more difficult than the one above because the neat initial stitches of the accent colours are not easy to make. It's challenging but I find this design very sophisticated.

There are so many designs you can make using only forward stitches and it's fun to make your own design or figure out how to make it. Of course you can always join us with a bi-coloured scales design. I look forward your participation.

P.S. I made three sales of thimble making trial kit, the ones I told you in my last post, so far. At the moment there is only one left on the shelf here and I will list a few more tomorrow morning. When you read this post and decided to purchase one for you but it was already sold out, please request an order using "request custom item" function at the right side column on my Etsy shop or leave a comment here so that I would know how many I should list them. Thank you. CP